
Design System Best Practices with ESLint Series
-

- Name
- Andrico Karoulla
- @AndricoKaroulla
If you’re creating a design system component library for your company or the open-source community, there’s a good chance that you have strong opinions on how end-users should consume your design system.
To ensure that your design system is used in its intended way, and to reduce the number of possible bugs, you might want your users to adhere to your best practices. The following are two examples of possible best practices:
- Avoiding inline styles in your elements
- Ensuring that tooltips don’t contain interactive content.
If you’re the only person designing, developing, and consuming your design system, then you can sleep comfortably knowing that your design system is being used exactly as intended.
Chances are you’re not the only person developing the design system and you’ll certainly not be present when someone consumes it. How can you feel sure that everyone abides by your design system’s best practices? You could cross your fingers and trust that your end-users read the documentation, heed your warnings, and never fail to abide by your rules.
Unfortunately, this is often not the case and it’s very easy to miss warnings or misunderstand how to properly use a tool. I’ve been there!
Fortunately, a great way to encourage your consumers to follow your best practices is through the use of ESLint, a static analysis tool to find problems in your code.
By default, ESLint ships with a handful of general best practices, called rules and will display red squigglys in your IDE if the rules have been violated. Some of these rules include:
- No duplicate keys in objects
- No unreachable code
- No unused variables
However, the rules you enable in your project don’t need to come directly from ESLint. Popular libraries like Cypress, Lodash, and React have ESLint configurations that anyone can use in their own projects to ensure users adhere to best practices. If you’re an intrepid explorer of the JavaScript language you can go a step further and create custom rules specific to your design system which you can export for other people to use in their projects. That’s exactly what we’ll do in these articles.
Part 1: How ESLint Can Enforce Your Design System Best Practices
In this article, we’ll spend a bit of time understanding how tools like ESLint parse JavaScript down into a data structure called an abstract syntax tree (AST). We’ll then touch on how ESLint rules work and how to parse our Lit templates into HTML. Finally we’ll start creating our rules. We’ll even use ESLint’s built-in testing tool to make sure our rules work under a variety of conditions.
The pre-requisite for this article is some JavaScript + HTML knowledge. A little experience using ESLint and Lit may come in handy but isn’t necessary.
What’s an Abstract Syntax Tree?
For those, like me, who haven’t gotten their hands dirty with compilers before, conceptualising how the human-readable language we write in our IDE gets understood (and transformed) by tools like Webpack, Prettier, and Babel can feel like magic.
Under the hood, when a tool like ESLint wants to start performing actions against your JavaScript it parses your code. Parsing is the process of taking the JavaScript you’ve written and turning it into a tree representation of the code, an abstract syntax tree (AST).
This process of parsing is split into two parts, tokenization and tree construction.
Tokenization takes the code and splits it into things called tokens which describe isolated parts of the syntax.
Tokens for a JavaScript program like:
const helloWorld = 'hello world';will look something like this:
[
  { type: 'IdentifierName', value: 'const' },
  { type: 'WhiteSpace', value: ' ' },
  { type: 'IdentifierName', value: 'helloWorld' },
  { type: 'WhiteSpace', value: ' ' },
  { type: 'Punctuator', value: '=' },
  { type: 'WhiteSpace', value: ' ' },
  { type: 'StringLiteral', value: "'hello world'", closed: true },
];The second step in the parsing process is tree construction, which reformats the tokens into an AST. The AST describes each part of the syntax and its relationship to the others.
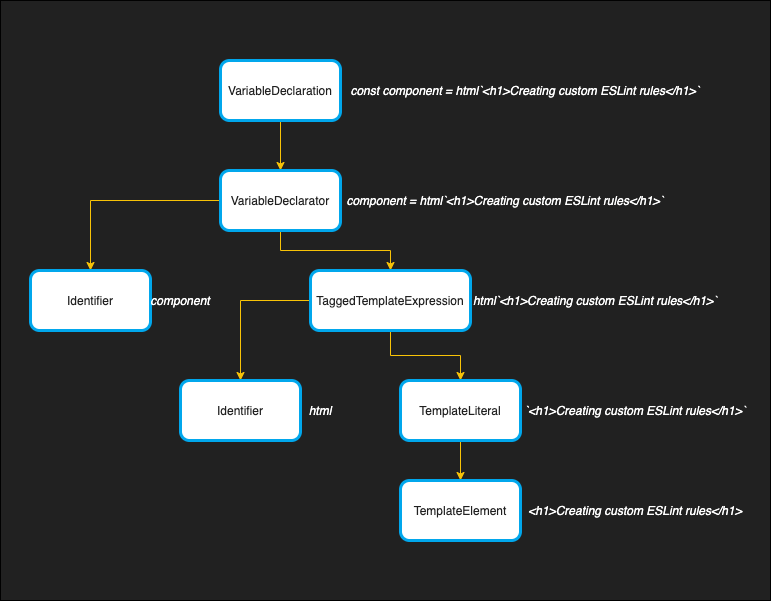
We can visualise this relationship by parsing the following JavaScript statement:
const component = html`<h1>Creating custom ESLint rules</h1>`;It would get transformed into an AST, with the following structure:
Tools like Babel and Prettier turn your written JavaScript into an AST to analyse and transform the code we’ve written. Babel uses the AST to transpile our code into a browser-friendly version of JavaScript, while Prettier uses the AST to reformat your code.
Getting Curious with the AST Explorer
To really explore what an AST looks like, have a play with the AST explorer. Get familiar with the AST explorer as we’re gonna be using it loads later in the article.
Write a simple statement, like the following:
const helloWorld = 'hello world';You’ll see that the top level of the tree describes the entire program and we can look into the body array to see the individual constituents of our above statement represented in the AST.
If you hover over the VariableDeclaration you can see that the entire statement on the left gets highlighted. If we go a level deeper into the declarations array you’ll see an additional node VariableDeclarator. If we keep going we’ll eventually reach rock bottom. In the case of our hello world statement, it’s with the variable’s Identifier and the variable’s Literal value.
Let’s revisit our component from earlier:
const component = html`<h1>Creating custom ESLint rules</h1>`;If you step through the tree in the AST explorer you can see that the structure matches our image from earlier. Pay particular attention to the TaggedTemplateExpression node and the TemplateLiteral node. These are the ones that will come in handy when we write our ESLint rules.
Our call to the html function is an expression, but it looks a little different from other function definitions. Let’s see how the AST differs with an expression like the following:
function heyThere() {
  return 'hey';
}

heyThere();
If we hover over the heyThere() ExpressionStatement, we see that the properties match our html ExpressionStatement. The main difference is that the value in the expression property looks different. The expression this time is a CallExpression, which has a set of properties different to that of our TaggedTemplateExpression.
If we look back at our TaggedTemplateExpression, we can see that we have properties like tag and quasi.
The tag gives us some details about the function name. Which in this case is html.
This means when writing our ESlint rule we’ll be able to do something like this:
// Some ESLint psuedo-code
function createRule() {
  return {
    TaggedTemplateExpression(node) {
      const isLitExpression = node.tag.name === 'html';

      if (isLitExpression) {
        // rest of the rule
      }

      // do nothing
    },
  };
}
Finally, if you look into the TaggedTemplateExpression object, you’ll see a property named quasi. This property contains our two noteworthy properties expressions and quasis. Take the following expression:

The blue underlines, the first and third respectively, will live in the quasis array and they’ll be in the order that they’re written in your template literal.
The green underline, the second one, will live in the expressions array, and provides a reference to the name of the variable. Like the quasis, the items in the array are in the order that they’re defined. This makes it very easy to reconcile your template literal later on.
Here’s a question for you, what happens if the first character of our template literal is an expression? How is this represented in our AST? Try the following snippet in the AST explorer:
const helloWorld = `${name}, how you doin'?`;Take a little more time exploring quasis and expressions if they still feel unfamiliar to you.
Fortunately, we won’t need to directly deal with the parsing process when writing our ESLint rules. We’ve covered a lot of ground because having a high-level understanding of how the tooling works, makes for a much more intuitive development experience later on.
How Do Eslint Rules Work?
The Visitor Pattern
Fortunately, we don’t need to make any transformation when writing ESLint rules and instead we write our checks against specific node types in our code. These nodes are slices from our code’s AST.
Once ESLint has parsed your code into an AST, it then traverses your tree, visiting each node along the way. For those familiar with programming design patterns, you might recognise this pattern as the visitor pattern.
The visitor pattern is a way of running some new logic against an object without modifying the object. ESLint uses the visitor pattern to separate the code used to run checks against your code from the AST.
Let’s take a look at the visitor pattern in action.
You can see, that I’ve implemented the visitor using 3 blocks of code:
ast.js: The AST forconst name = 'andrico'traverser.js: An algorithm that traverses the nodes of our AST.visitors.js: An object of methods where a given method fires once the traverser reaches its corresponding node. In our case, when the traverser reaches aVariableDeclaratornode, it fires off our visitor function.
Let’s break down the traverser a little more:
We begin in index.js by creating an instance of our Traverser class and passing through our AST and our visitors. Under the hood, our Traverser class stores our AST and visitors as instance variables for us to use later.
We then invoke the instance’s traverse method. If you move to the traverser.js file, you can see that when we invoke traverse 5 things can happen:
- The node is
null, which will happen when we manually invoke thetraversemethod without any arguments. When this happens, we kick off the traversal function using the AST we stored during the class’s initialisation. - The node has a type of
Program, which will happen for the top-level nodes in our AST. When this happens we recursively call the traversal method on the child nodes. - The node has a type that matches a visitor function. When this happens, we fire our visitor function and pass through the node as an argument.
- The node has additional declarations, so we continue calling our traversal function on those child declarations.
- Our node satisfies none of these conditions, which will cause our traversal method to exit.
In the context of our const name = 'andrico' example, our traversal function will continue making its way through the AST until it reaches the VariableDeclarator, where it will invoke the visitor we defined in visitors.js. In this visitor we check to see if the value is Andrico and if it is, we log a message saying that it’s an invalid name (though I kinda like it).
Open the console in the CodeSandbox and see what it outputs. Try changing the check in your visitor and see what happens, if anything.
The good news is that ESLint handles the traversal logic for our JavaScript. The other good news is that we’ll need to implement the traversal logic for our parsed HTML. 😄
What Does an Eslint Rule Look Like?
Writing an ESLint rule doesn’t require anything fancy, it’s just a plain ol’ JavaScript object. The object’s top-level can receive two properties: meta and create.
meta provides the metadata for the rule.
The create property is a function that returns an object of visitors that ESLint calls when it visits each node. This follows the same principle as the snippets in the codesandbox. And much like the demo in our codesandbox, the name of each visitor function is the name of the node that we want to visit.
In fact, we can even repurpose the pseudo-code from earlier, and decorate it with the ESLint specific boilerplate:
module.exports = {
  create: function create() {
    return {
      TaggedTemplateExpression(node) {
        const isLitExpression = node.tag.name === 'html';

        if (isLitExpression) {
          // rest of the rule
        }

        // do nothing
      },
    };
  },
};
The create function also provides a context object, which provides some additional helpers and information about the current rule. The helper we’re most concerned with right now is the report() method. We can call report whenever we want an ESLint error to display in the console or the IDE.
Context.report takes an object with a handful of properties, but we’re most interested in the following:
- message: the description of the problem
- node: the AST node related to the problem
Before continuing, why not think about adjusting the pseudocode above to display an ESLint error when a tagged template is invoked, and the template literal has no content, like this:
const expression = html``;With a basic understanding of JavaScript’s AST, the visitor pattern, and the anatomy of an ESLint rule, the only thing left to cover is how to parse our template string into HTML before we can start creating our rules.
For a more in-depth read into the anatomy of an ESLint rule, there’s no better place to look than the official docs.
How Can We Transform Our Templates into HTML?
When using ESLint, we have the luxury of ESLint providing us with our parsed JavaScript AST. And while ESLint can’t parse our HTML, we can use a library like [parse5](https://github.com/inikulin/parse5) to parse a valid HTML string into a data structure, not unlike our JavaScript AST.
The AST explorer we’ve spent so much time exploring even has settings for displaying HTML ASTs.
Since one of our rules is going to prevent us from passing through inline styles, let’s see how the following gets represented as an AST:
<div style="display:inline;">Main content</div>If we dive into the AST and look for our div, we can see we’re presented with some useful information. The most notable are:
tagName: Which is the name of the html element. (in this case div).
attrs: Which is an array of attributes, represented as a key-value pair. Our div’s attrs property holds a single item. The item has a name of style and a value of display:inline;.
Using this information we can already start seeing how to piece together everything we’ve learned to create our first lint rule.
Here’s how we can parse our JavaScript templates using the parse5 library:
import parse5 from 'parse5';

// We're defining out HTML templates
const htmlString = `<div style="display:inline;">Main content</div>`;

// We're passing through an HTML snippet to parseFragment, which returns our HTML AST
const parsedFragment = parse5.parseFragment(htmlString);

// We access the first child because the top-level contains metadata we don't need right now.
const div = parsedFragment.childNodes[0];

// We check to see if there are any style attributes in our div
const hasStyleAttr = div.attrs.some((attr) => attr.name === 'style');

// If there are, we report an error
if (hasStyleAttr) console.log('FAIL');
Thanks to tools like parse 5 and ESLint, we can offload a lot of the complex processing, and focus on writing the code for our specific rules. This is what we’ll start doing from the next article onwards.
Vibe Check
We’ve covered a lot of theory so far, and a lot of separate ideas. We’ll bring everything together in the next article.
Let’s have a vibe check, if something doesn’t quite make sense at this point, it’s worth giving it a quick re-review. And if things still aren’t clear, that’s probably on me, so feel free to reach out and let me know how I can make things even clearer.
Before we move on, let’s go through the key points one last time:
- The JavaScript we write gets parsed into an AST, which tools can use to validate or transform our code
- Each part of our JavaScript code is represented as a node, as seen in the AST explorer.
- ESLint then traverses our AST, and invokes our visitor functions whenever it visits a node we’re interested in.
- Once ESLint invokes our visitor function, we can start running checks against the node.
- We can then check to see if the node that gets passed to our function is a
litTaggedTemplateExpression, and if it is, we can grab its HTML fragment, which we can build by consolidating the expressions and quasis. - We’ll use
parse5to parse the fragment and give us our HTML’s AST. - We now have everything we need to run our checks, like seeing if a certain attribute is present when it shouldn’t be.
- We can then invoke ESLint’s report function if the rule has been violated.
We’ve learned a lot of theory, and the best thing to do with all that theory is to put it into practice. In the next two articles, we’re going to be creating a couple of ESLint rules and taking everything we’ve learned into something you can use for your own design systems.
The Design System Best Practices with ESLint Series: