Using the Tokens Studio for Figma plugin
Here we demonstrate the flow in a 2-minute video, showing the power of Design Tokens using the Tokens Studio for Figma plugin and Backlight.
These docs will cover GitHub & Backlight, but they are not mandatory. You can use any of the options supported by the Tokens Studio for Figma plugin sync feature, as long as they also have some form of CI/CD (Continuous Integration / Continuous Deployment), or alternatively, use a third party option like CircleCI. If you want to use Backlight, check out our current supported providers.
Workflow summary
- A designer changes some tokens in the Tokens Studio for Figma plugin and pushes the changes to GitHub.
- A pull request is created automatically inside GitHub
- Style-Dictionary is executed and results are added to this PR automatically
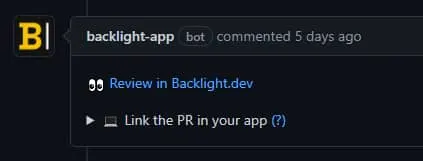
- A Backlight preview link will appear in the PR
- Designers (& optionally developers) can see visual changes and review + approve
- Changes are merged into main branch
Note how 0 developers are needed here!
Code and design will be in sync 🎉 and designers will have more autonomy.
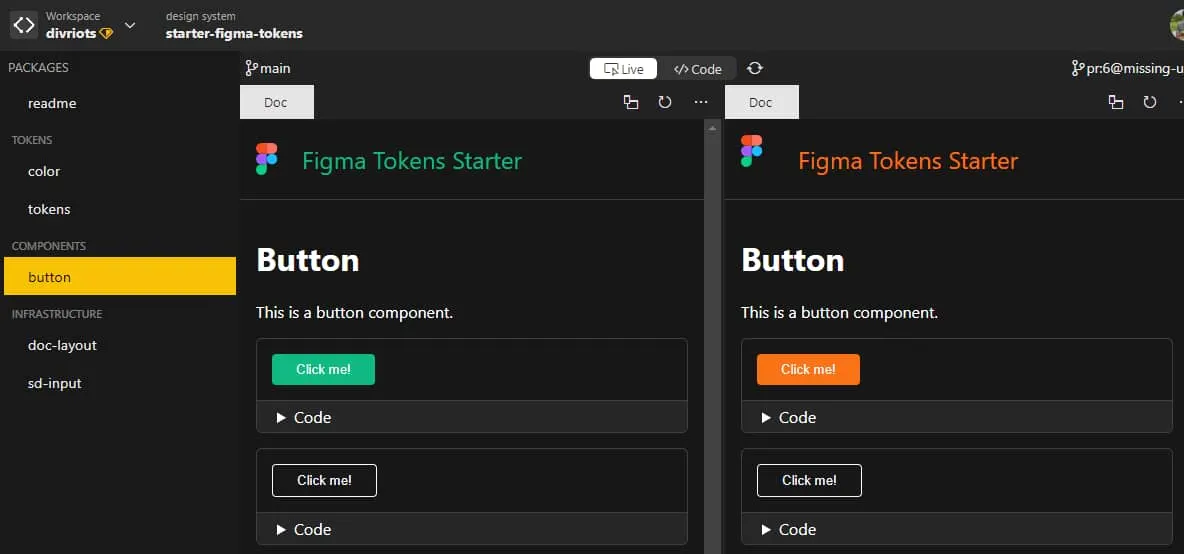
Full video
Below, Joren shows how he created this starter kit by walking you through connecting the Tokens Studio for Figma plugin, Backlight and GitHub to your Figma design system. This enables the flow shown in the video above.
Alternatively, follow the steps below to set up the Tokens Studio for Figma plugin with your Backlight project.
In these examples, we show how we set up a project which is equivalent to our Figma Tokens starter kit, which you can also duplicate as a quick start.
You'll still need to hook it up to your GitHub repository, Figma Library, and the Tokens Studio for Figma plugin.
Connect to GitHub
In your Backlight project, make sure to connect to GitHub first if you haven't already.
Tokens Studio for Figma plugin
As a first step, create a Figma file and start with some Design Tokens.
Install the Tokens Studio for Figma plugin by Jan Six and open it in your Figma file.
Tokens
Now, let's start creating some Design Tokens in this plugin.
If you've duplicated the starter kit, you can connect this to your own GitHub project, meaning you will already have Figma Tokens JSON in your repository which you can pull from in the Tokens Studio for Figma plugin. You will also have a Style-Dictionary config and GitHub Action workflows setup. In this case, skip to the GitHub Sync section.
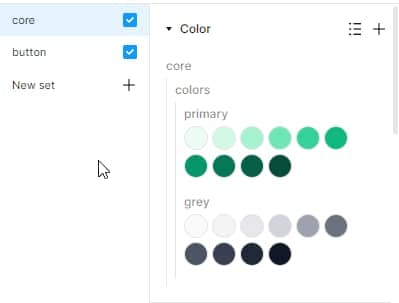
We create a color palette consisting of a primary color with a 50-900 lightness range, as well as a greyscale using the same technique. In the example, we went for emerald green. We put these colors in a core tokenset.
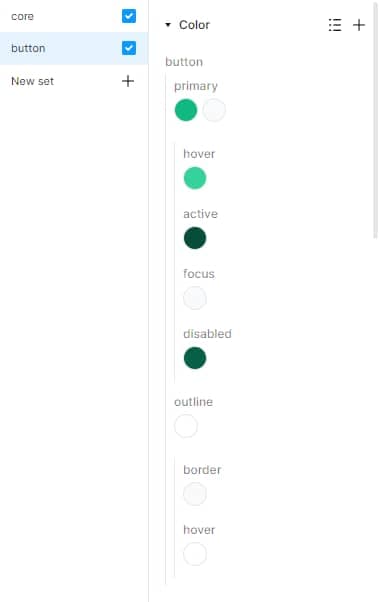
After this, we create a button tokenset where we will start defining the colors for our simple button design.
The Figma file is public. You can also view the tokens JSON inside GitHub
We will synchronize these Design Tokens to GitHub in the last step.
Style-Dictionary
We will soon have some Style-Dictionary input files generated automatically from our Figma Design Tokens. This will enable us to start exporting our Design Tokens to a platform of our choice.
In this example, we will take CSS Custom Properties (also known as CSS variables).
Inside Backlight, create a sd.config.cjs if you don't have one yet. Here you can choose how you'd like to export your Tokens, for example:
module.exports = {
  source: ['sd-input/**/*.json'],
  fileHeader: {
    autoGeneratedFileHeader: () => {
      return [`Do not edit directly, this file was auto-generated`];
    },
  },
  platforms: {
    css: {
      transformGroup: 'css',
      buildPath: 'tokens/',
      prefix: 'figma',
      files: [
        {
          destination: 'variables.css',
          format: 'css/variables',
          options: {
            fileHeader: 'autoGeneratedFileHeader',
          },
        },
      ],
    },
  },
};
Note that we added a custom fileHeader called autoGeneratedFileHeader. The default one from Style-Dictionary will put a comment with the current date and time of when the tokens were generated. This can lead to merge conflicts on this line happening quite often when multiple diverging branches end up running Style-Dictionary but without actual token changes. It gets quite tedious to have to solve those one-line merge conflicts every time, so in our custom header we leave that date/time out.
Push these changes to the default branch through a pull request, you can do this using the Backlight interface.
GitHub Action
To automate everything, we need to take one more step. When you change tokens in Figma, then sync to GitHub, this should create a pull request. In this pull request, we will get the new sd-input tokens, but we need to run a token-transformer and Style-Dictionary as well to get the output variables.css. We can automate that with GitHub Actions.
Start by locally cloning the GitHub repository and opening it in your editor.
Push workflow
Create a workflow:
.github/workflows/figma-tokens-push.yaml:
name: Create Tokens Studio for Figma PR

# match the branch you put in your Tokens Studio for Figma sync credentials in the next step
on:
  push:
    branches:
      - figma-tokens

jobs:
  pull-request:
    runs-on: ubuntu-latest
    steps:
      - uses: actions/checkout@v2

      - name: Create Pull Request
        uses: repo-sync/pull-request@v2
        with:
          destination_branch: 'main' # match your default branch
          pr_title: 'Figma Tokens Update'
          pr_body: '🍥 Design Tokens were updated in Figma! This PR was created to update the code.'
          github_token: ${{ secrets.GH_PAT }}
For this workflow to run, you will have to add a GitHub Actions secret called GH_PAT. We must use a personal access token here because this workflow must trigger another workflow through a pull request event, and with the default GitHub Action token this will not happen, as protection against unintended trigger loops between workflows.
Create a Personal Access Token in your GitHub developer settings.
Then add this to your secrets:
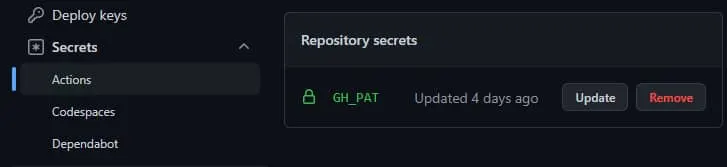
Make sure to store the token somewhere, as we will reuse it in the next step.
Pull request workflow
Create a workflow:
.github/workflows/figma-tokens-pr.yaml:
name: Process Figma Tokens PR

on: pull_request

jobs:
  run_if: # only if base branch is "figma-tokens"
    if: ${{ github.head_ref == 'figma-tokens' }}
    name: Process Figma Tokens
    runs-on: ubuntu-latest
    timeout-minutes: 5
    steps:
      # checkout to the head of this PR
      - uses: actions/checkout@master
        with:
          repository: ${{ github.event.pull_request.head.repo.full_name }}
          ref: ${{ github.event.pull_request.head.ref }}

      - name: Install Dependencies
        run: npm install

      - name: Run token-transformer
        run: npx token-transformer sd-input/src/figma-tokens-output.json sd-input/src/sd-input.json --resolveReferences false

      - name: Run style-dictionary
        run: npx style-dictionary build --config sd.config.cjs

      - name: Commit changes
        uses: EndBug/add-and-commit@v9
        with:
          author_name: Example
          author_email: example@gmail.com
          message: 'chore: style-dictionary output'
          add: '.'
Make sure to change the author_name and author_email to use your own information.
Now push your changes to the default branch (either directly or through a pull request).
GitHub sync
This is the last step, setting up the GitHub synchronization in your Tokens Studio for Figma plugin and pushing the Tokens.
In the Tokens Studio for Figma plugin Settings, go to the Token Storage -> GitHub tab.
Click on Add new credentials and fill out the information to synchronize your tokens to GitHub.
Creating a Personal Access Token can be done in your GitHub Developer Settings.
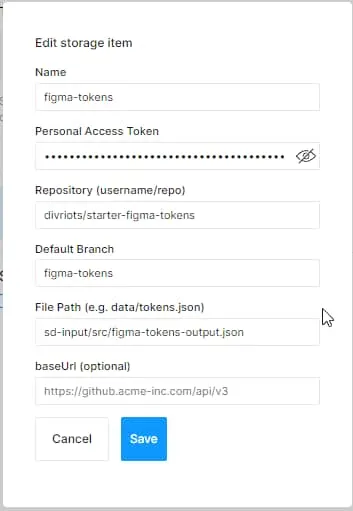
For our workflow, make sure to pick a default branch here that is not the GitHub repo's default branch. This workflow will automatically create pull requests to the default main branch when pushing our Tokens from Figma.
For file path, we pick sd-input as our package folder which will act as the input for Style-Dictionary.
After saving, it should prompt you to push your tokens. Push your tokens. Make sure you don't click "Create Pull Request", GitHub Actions will do this automatically for us!
Any time you want to push Token updates, you can click the sync push button:

What's more awesome is that due to Backlight's GitHub integration, your PR will get a comment with a link to a visual diff view so you can see your changes visually in the coded components.